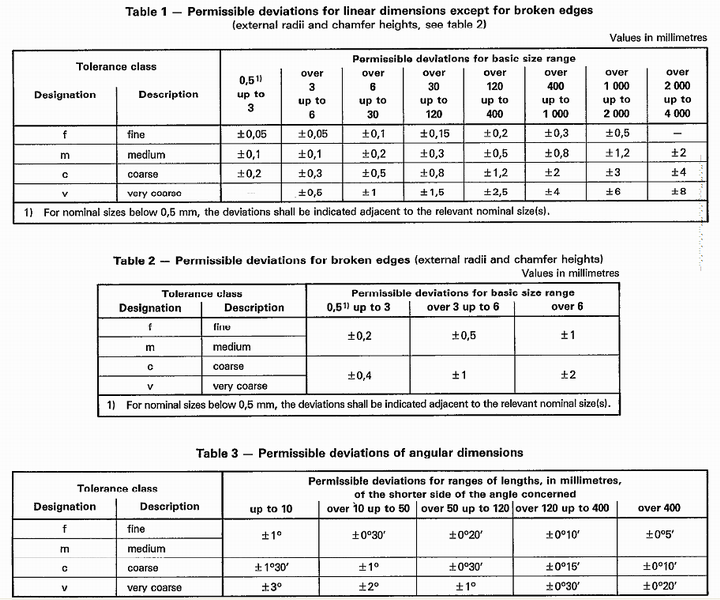
Iso 2768 Mk Tolerance Table
Designation
Division of basic dimension 0.5 (1)
Over 3
Over 6
Over
Over
Over
Over
Over
up to 3
up to 6
up to
30 up
120 up
400 up
1000
2000
30
to 120
to 400
to
up to
up to
1000
2000
4000
Description
Permissible deviations f
fine
0.05
0.05
0.1
0.15
0.2
0.3
0.5
-
m
medium
0.1
0.1
0.2
0.3
0.5
0.8
1.2
2
c
coarse
0.2
0.3
0.5
0.8
1.2
2
3
4
v
very coarse
-
0.5
1
1.5
2.5
4
6
8
Note (1) :
For basic dimensions below 0.5 mm, the deviations shall be indicated adjacent to the relevant basic dimension(s).
Table 2. Permissible deviations for linear dimensions of chamfered parts (Rounding of corner and chamfered dimension) Unit : mm Tolerance class
Division of basic dimension
Designation
Description
0.5 (1)
Over 3
up to 3
up to 6
Over 6
Permissible deviations
Note (1) :
f
fine
m
medium
c
coarse
v
very coarse
0.2
0.5
1
0.4
1
2
For basic dimensions below 0.5 mm, the deviations shall be indicated adjacent to the relevant basic dimension(s).
Table 3. Permissible deviations for angular deviations
Tolerance class
Deviation of length (unit : mm) of the shorter side of the angle concerned Up to 10
Designation
Description
Over 10
Over 50
Over 120
up to 50
up to 120
up to 400
Over 400
Permissible deviations f
fine
m
medium
c v
1°
30c
20c
10c
5c
coarse
1°30c
1°
30c
15c
10c
very coarse
3°
2°
1°
30c
20c
Table 4. General tolerances on straightness and flatness Unit : mm Straightness and flatness tolerances for ranges of nominal lengths Tolerance
Up to 10
class
Over 10
Over 30
Over 100
Over 300
Over 1000
up to 30
up to 100
up to 300
up to 1000
up to 3000
General tolerances on straightness and flatness H
0.02
0.05
0.1
0.2
0.3
0.4
K
0.05
0.1
0.2
0.4
0.6
0.8
L
0.1
0.2
0.4
0.8
1.2
1.6
Table 5. General tolerances on perpendicularity Unit : mm Perpendicularity tolerances for ranges of nominal lengths of the shorter side Tolerance class
Up to 100
Over 100
Over 300
Over 1000
up to 300
up to 1000
up to 3000
General tolerances on perpendicularity H
0.2
0.3
0.4
0.5
K
0.4
0.6
0.8
1
L
0.6
1
1.5
2
Table 6. General tolerances on symmetry Unit : mm Symmetry tolerances for ranges of nominal length Tolerance
Up to 100
class
Over 100
Over 300
Over 1000
up to 300
up to 1000
up to 3000
General tolerances on symmetry H
0.5
K L
0.6 0.6
1
0.8
1
1.5
2
Table 7. General tolerances on circular run-out Unit : mm Tolerance class
Circular run-out tolerance
H
0.1
K
0.2
L
0.5
Iso 8015 Tolerancing

Iso 2768 Mk Standard
ISO 2768 is a standard for general tolerances, specifically covering linear dimensions, angular dimensions and geometrical tolerances. For new designs only the general tolerance according to DIN ISO 2768-1 should be valid. The limit measurements of the tolerance classes m and f of DIN ISO 2768-1 are identic with those of DIN 7168-1. According to DIN ISO 2768-2. DIN ISO 2768-2 is for simplifying drawing and fixes general tolerances in three tolerance classes for form and position. Doug, there are 2 parts to ISO 2768.1 refers to tolerances for linear and angular dimensuons without tolerance indications and -2 refers to geometric tolerances for features with individual tolerance indiscations. So, in -2 you'll see that K is a tolerance class Steve. IS0 2768-2 2768”; b) the tolerance class Related searches for iso hole tolerances 2768 mk din iso 2768 mk tolerances - practical machinist m. Follow: General tolerances according to DIN ISO 2768-mk 1) Without general tolerances DIN ISO 2768-mK DIN EN ISO 13920-BF NN 14 T. Se Table 1 - Permissible deviations for. Fornominalsizesbelow0.5mm,thelimitmeasuresareusuallyindicateddirectlyatthe nominalmeasure.IfgeneraltolerancesaccordingtoISO2768-1arevalid,thefollowing.